Google

Friday, December 31, 2021

The Golden Arches

It's the last post of 2021. I hope you all had a great year. I look forward to sharing more layouts with you in 2022! 

The next display was for Arches National Park. There were multiple arches made of stones, wood and flowers all lined up along the walkway. It's funny how an arch makes you change perspective. Do you look at the arch itself or do you look at what is revealed in the opening? Or both! I think you'll see that I took both perspectives in my photos.


This layout is based on a class I took. I used more of the paper from the Mystery Box as well as some red/orange cardstock. I had the title from a page of park names that someone gave me and it drove the rest of the colors on the page (though the display certainly matched that tone as well). You can see that the paper was cut and then folded back on itself to get the contrast in the 4 quadrants of the layout. That also means that you can tuck photos under the edges for a change. I added the arched border across the top to highlight the theme and then just a few stickers from my stash that were floral but in the same red/orange tone. 

Friday, December 24, 2021

Stop and Smell the Roses

Tomorrow is Christmas Day. I hope you have an enjoyable holiday season with friends and family. Thanks so much for adding me to your celebration! 

As I came to the end of my night at the Flower Show, the displays change from the over-the-top extravaganzas that I've been showing you, to smaller, compact, and sometimes even dainty displays. I loved this small set of flowers and a manikin from Weir Farm. The park is all about artistry and many people go there to paint landscapes. The artist who originally lived there had painted "Flora" and that photo was turned into a 3-D rendering through flowers.


This layout is based on a sketch from the February CM Virtual Crop. I used papers from the Full Bloom collection for the edges. This type of layout is a great way to use up scraps from any collection. The inner-most 3 squares are all one sheet of paper. By using the CM 12" trimmer, I can stop a cut before coming to the edge of the paper. I made several squares by trimming a block from the center of each consecutive cut. By flipping the middle square, I had a nice set of contrasting colors. The green and dot paper is not from Full Bloom, but from a "green" themed pack. CM offers those types of packs fairly often so they can coordinate with multiple other paper sets. It certainly helped pull Full Bloom into a full layout.

Friday, December 17, 2021

It's All There in Black and White

Lots of photos for you today! The next set of displays focused on a brilliant photographer named Ansel Adams. Known for his dramatic photos of landscapes using black and white photography, a group of designers used the black and white motif to present multiple national parks in this theme and even included large prints of Adams as backdrops. I am putting them all in this post as I think they should be seen together. 

The first park represented was one I would not think of seeing in black and white--Kalaupapa National Historical Park in Hawaii. The site is now a place of refuge but had originally been isolation for those with leprosy and other infectious diseases. It's now home to many rare plant species. The cascading flowers create a lot of movement in a still-life I think.

This layout was created for another challenge in the CM Virtual Crop in February 2021. I again turned to the mystery box papers. I thought blue was a good color to offset the black and white flowers. Two of the papers had ombre tones in them and I thought flipping the stripe ombre (dark top, light bottom) on the regular paper (light top, dark bottom) highlighted the cascades on the photos. I chose yellow stickers to accent the page as well. There are some ivory/yellow tones in some of the "white" photos--though that might be artifact from the lights in the space.

The next part of the display was the domed room of Carlsbad Caverns. I have visited this park but not been in the cave so I definitely need to go back someday. I do like going through caves, as long as there is ample room to walk. I'm not one of those who want to go on the cave tour where you have to shimmy through a box to prove you won't get stuck. Let's just admit that I'll get stuck and leave me on the regular path!


This layout is another sketch from the virtual crop. More importantly, it used a template that was included in the mystery box. Check out the blog post here to see the sketch and a photo of the template (you couldn't buy it, you could only get it in the mystery box). I will be the first to admit, I don't really like using templates. I've used them several times and I always seem to mess up the cuts and ruin the intended "symmetry". This one had a lot of straight angles so I figured I could use my trimmers to make the cuts, which helped a little. I chose papers from the O Canada pack. The darker background reminded me of stone and the yellow I chose just as an accent. The diamond-shaped pieces are from a scrap of stone paper I still had. I thought it would help fill in the page since I didn't have many photos of this section. I finished by using an icicle border maker cartridge to punch stalactites and stalagmites for the edges. That's probably the part of the layout I like best.

Next stop, the Grand Canyon! I've been here twice now and I can't say that I ever knew there were aspen groves! I focus so much on the canyon that I forget there are other things. Here they are collected and secured with flowers around the middles. 

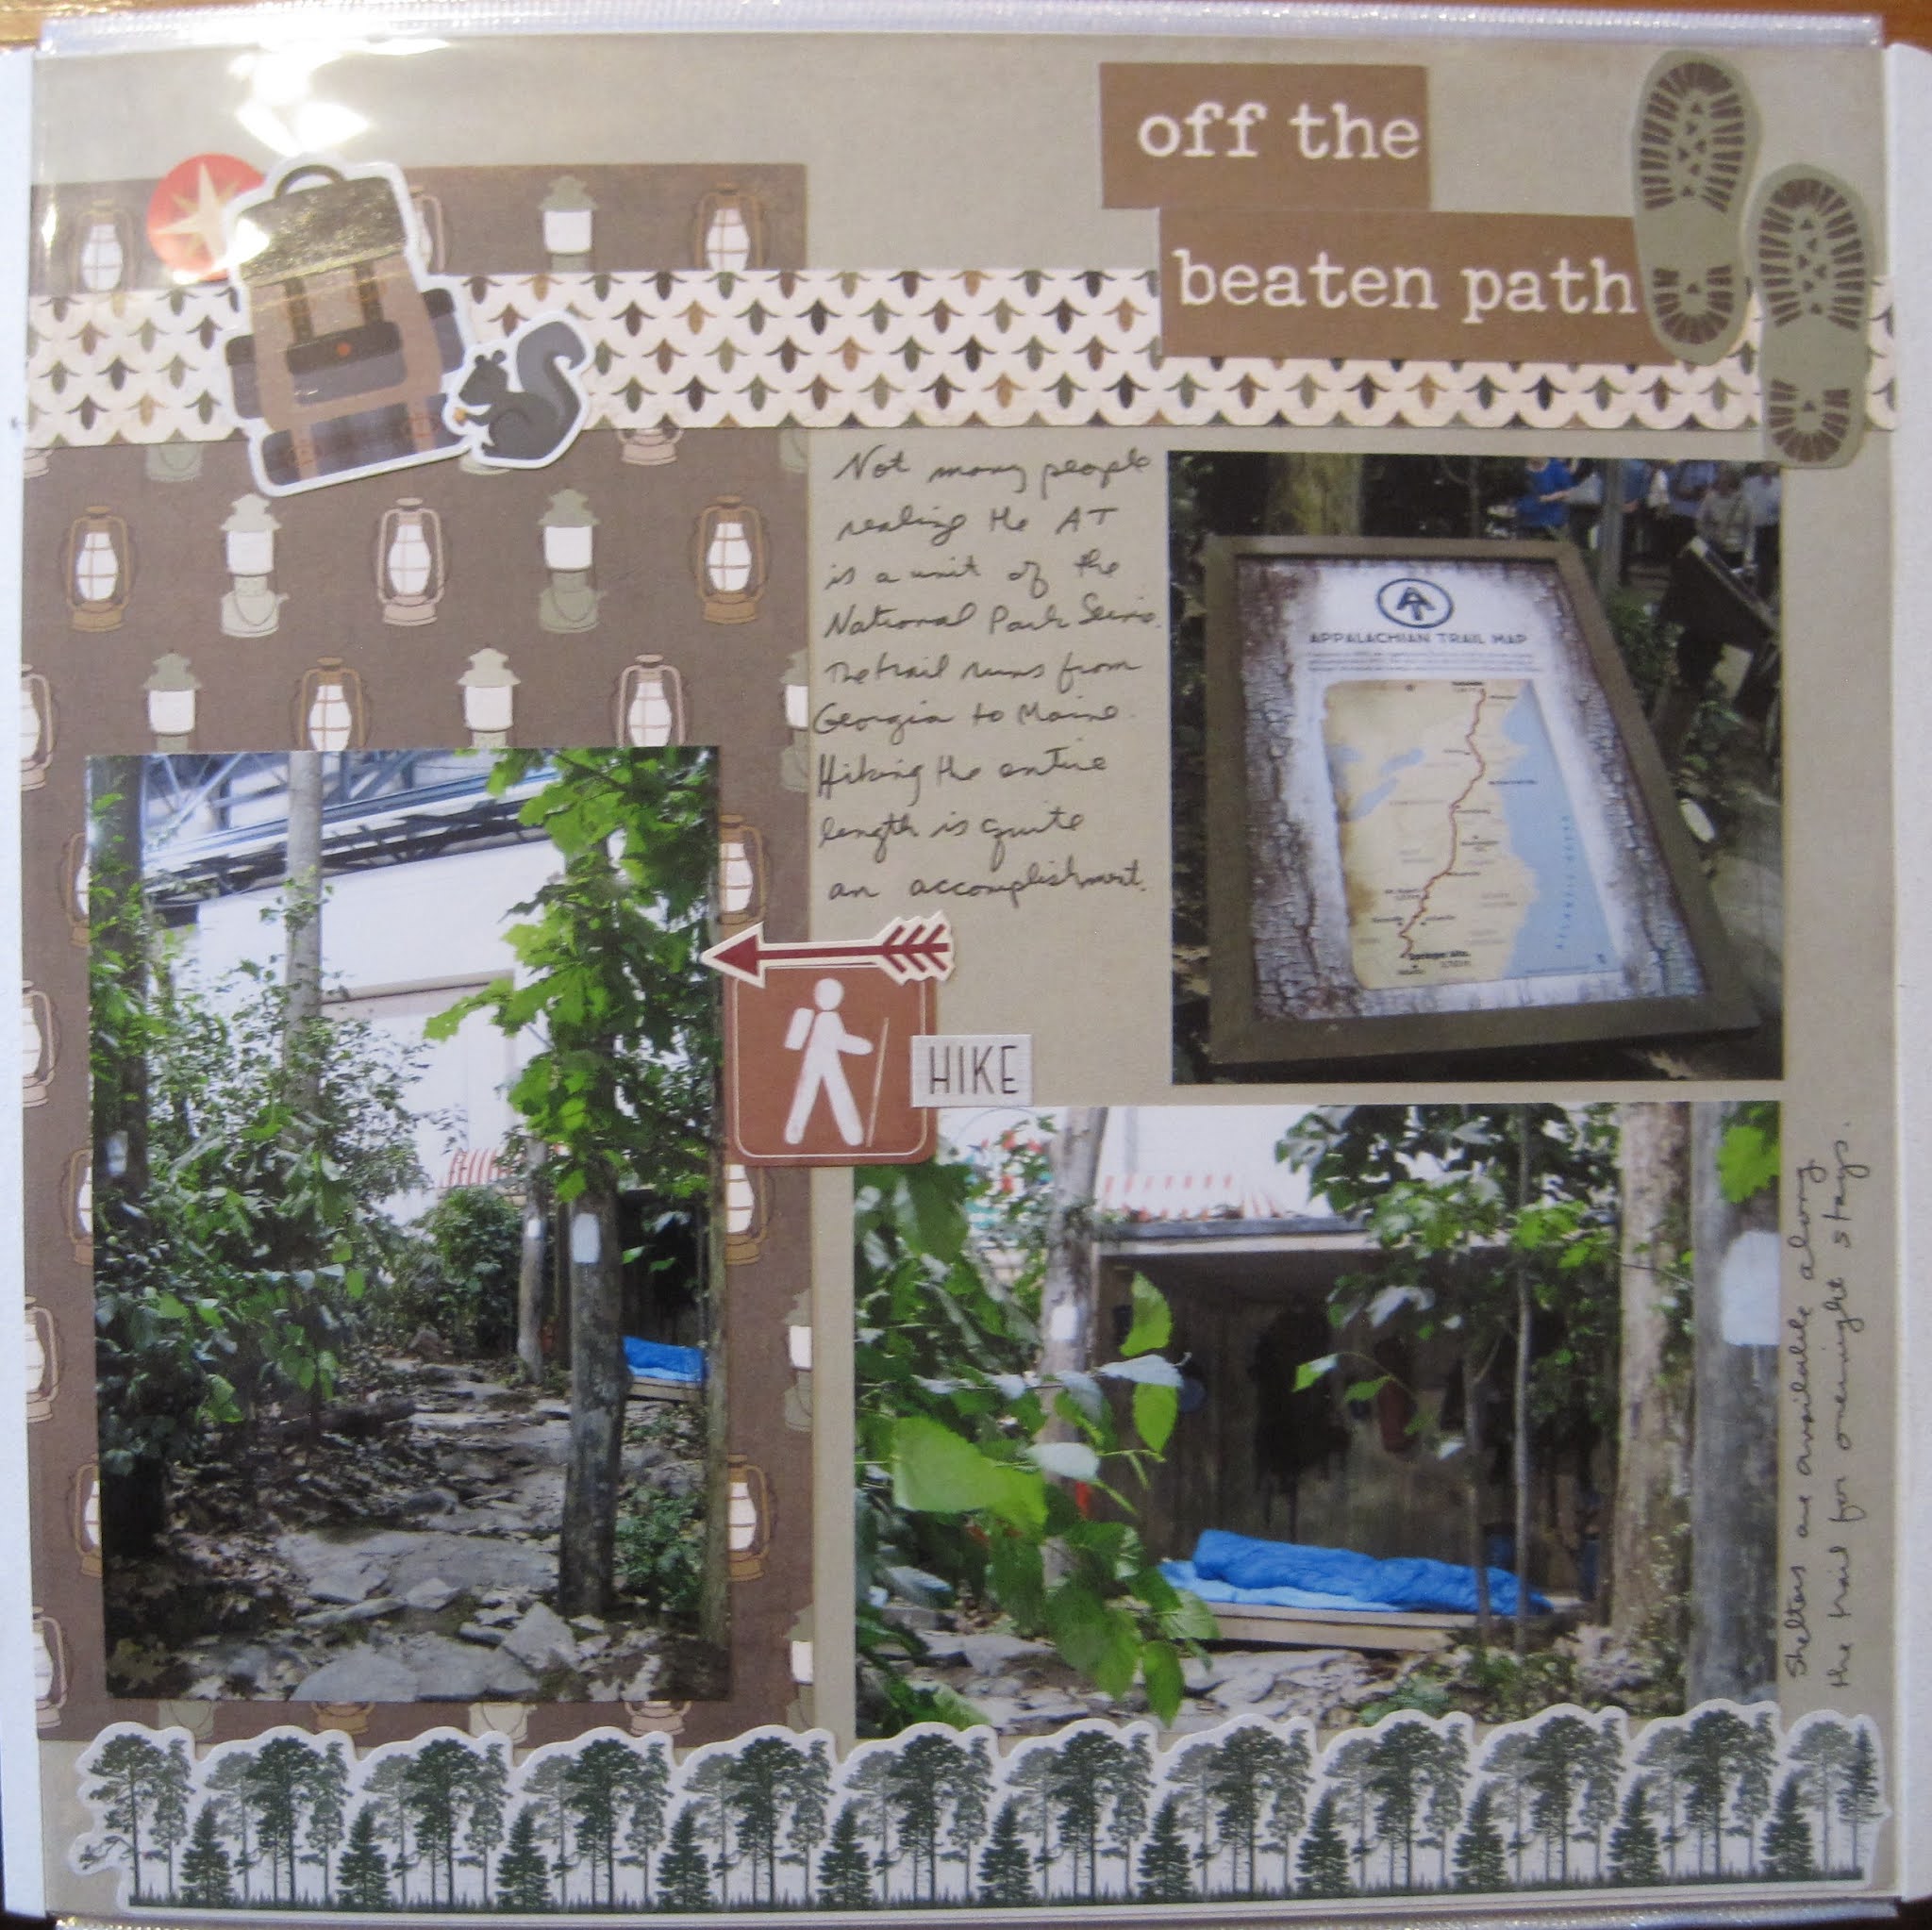
This was one more of the challenges for the virtual crop. I changed the number of photos in the original sketch, which you can see here. I utilized paper from the Camouflage pack. The background paper is birch bark and I turned it so that there was some definition against the direction of the trees in the photo. I also used leafy paper in the middle to help the photos stand out. Two brown borders also helped define the photos. One is a leftover border and I liked that it had the hiking boots printed on it. I chose the CM Stamping set to create the title. I thought that the uneven covering of ink on the letters also represented the tree bark.

OK, we come to the last layout in the Ansel Adams collection. This one is King's Canyon--another site I've not been to. Though I found out recently that my grandparents did! I have their photo album from the 1960s when they went on several cross-country trips and my grandmother labeled many of the sites so I know where they are. Now I can recreate their photo when I visit!


One more sketch from the virtual crop (check it out here). I returned to the mystery box papers and to the use of blue to offset the black and white flowers. For one of the circular elements, I chose to create a journal box by using the custom cutting system on a piece of ruled paper. I accented with some stickers (top and bottom) from a couple of older, non-related CM packs. But I thought the colors and tones matched the layout. My favorite piece of this layout is the border at the top and bottom. I used a new border maker cartridge called "Mirrored Triangles". In addition to punching a set in white, I punched a set in black and used that to edge the white against the striped paper. It gives a great shadow effect. The title was one of our laser-cut titles. I love those packs. So much easier than splicing letters together!

Friday, December 10, 2021

It's BOTH

One of the more unusual designations in the National Park Service is for the Redwood Forest. It is both a National and a State park! I don't know how they separate out the duties and the funds but I'll have to explore that when I get a chance to visit the real trees. In the meantime, we'll enjoy the beautiful display from the Flower Show. We see more poetic license here, in more ways than one! First, the "Chandelier Tree" doesn't have a chandelier in it--it was named for the way the branches flow, resembling a chandelier. Second--the Chandelier tree is NOT part of the NPS unit. It's a privately owned area that charges for the privilege of driving through the tree. The National Park site has no entrance fees. Of course, there are no drive-thru trees in the park either--not since 1969. You have to admit though--the team did an EXCELLENT job on this display!


For this layout, I was participating in the February Virtual Crop with Creative Memories. You can see a copy of the sketch here. This month was one of the "Mystery Boxes" that CM has a few times a year. We buy the box and leave it sealed until the first sketch is released and we join in a virtual unboxing together. It's a lot of fun! Then we're encouraged to use that material for our layouts for the crop if it works with our photos (but it's not mandatory). It did work for my photos. The orange and green combinations highlighted the earthy tones of the photos. The one non-Creative Memories element is the large tree on the left. That's from the Eastern National Scrapbook kit. There's really no better embellishment for this display!

Friday, December 3, 2021

Not so Tiny

Last week we looked at a tiny home. This week we move to the Redwoods of Muir Woods--definitely not tiny! You can see the structure from across the entire convention center floor. It's an odd structure but is meant to represent the rings of the large trees. You can walk under it to look at it through the center (bottom photos).


This layout is based on a class sketch. I have to admit, it is not necessarily one of my favorite layouts, but it is done. I used more of the Woodland Whimsy pack for the background and the large circle. I chose a different pack for the contrasting stripe across the middle and that's the piece that I probably should have changed. The background was chosen because it matched the smaller hanging elements. The stripe was for the surrounding trees. But I think it skews a little more tropical than it should. Still, it's done!

Friday, November 26, 2021

A Tiny Bit of Olympic National Park

I hope you all had a great Thanksgiving! I want to thank you for following my blog and my journeys through the National Park System.

The display for Olympic National Park featured the concept of "Tiny Houses". The builders are recommending a structure like this as a visitor center to help preserve the environment. The outside of the house included local trees and plants as well as a small garden. Going through the display did bring back wonderful memories of my trip there.


This layout is based on one of my class sketches from February. I used a background from the Woodland Whimsy collection and a dark strip for the banner from the S'Mores collection. I was able to use up a bit more of my Olympic Park stickers as well as a few random nature stickers from my collection. I love these pages when they come together quickly.

Friday, November 19, 2021

Poetic License

The title this week is the only thing I can think of to explain the next exhibit. If you see the actual monument at Lincoln's Birthplace, you will see a large marble structure. Inside there IS a replica of a birth cabin. The display below in no way resembles either of those 2 entities. But they were going for rustic simplicity and I suppose they did achieve their goal.


I looked through my saved pins featuring flowers and a general "Spring" theme and found this blog post from Creative Memories. I had pulled my Full Bloom collection as one of the items I wanted to use for this album and so I was able to replicate the borders. Given the large photo (created by welding 3 separate 4x6 photos together) it seemed the perfect backdrop to the rustic garden on display. I was also able to use a few of my paper flowers in the upper right corner. It's not a design element I use often so when I get a chance to use my stash I take it!

Friday, November 12, 2021

The Devil Went Down to Jersey?

 In New Jersey, there is a National Reserve (an affiliated area, not a true national park) called the Pinelands. If you grew up in New Jersey you likely heard tales of the "Jersey Devil" -a creature that flies around the Pine Barrens creating havoc. It's their version of Sasquatch apparently. The story was told in this display but they also highlighted the various crops like berries and vegetables grown in the area.


This layout is based on a border sketch from Creative Memories. Our CM Advisor group was given the challenge to use one of the sketches from the weekend and I made this border from pumpkin and apple border maker cartridges. I used paper and stickers from the "Locally Grown" pack due to the gardening nature of the display. The pumpkins and apples are a little too close to the same shape and I didn't get the variety of colors I was looking for to make them stand out, but it's a cute border and just needed a backdrop for the photos and journaling box. 

Friday, November 5, 2021

The Unofficial State Bird

So many states claim the mosquito as the unofficial state bird that it's almost a cliche. But when you see "Mosquito Meter" crafted into the display, you know there are bound to be problems. I guess I'll need to carefully plan my visit to the real park so that it's not a war zone! You'll remember that Jim and I experienced a horde of mosquitoes during our visit to Portsmouth Island (or check out that blog post by clicking the link). I may have to do this park without him!


This layout is again from one of the classes I took. It was a fairly simple concept where you lay out the letters and a border sticker and then chop and mat them to create a crazy title. I had kept a piece of the S'More Memories pack that had dragonflies as the design. But given the photo of the Mosquito Meter, you thought mosquitoes instead, right? This layout only used one piece of paper. I cut the squares for the corners from the left-over paper after the title was done.

Friday, October 29, 2021

The OTHER big trail

The next display covers another immense trail in the National Park System--the Pacific Coast Trail. Unlike the Appalachian trail, this is not an official unit. The trail extends from the Mexican to the Canadian borders and so crosses a wide variety of environments. The designers condensed all of that to just a few square feet of floor space! 


This layout is from the same class as the last 3 entries--so again, no sketch. The design focused on building those borders on the left and bottom right. My cuts were supposed to be through the middle of a chain punched with the Border Maker System. But the cuts are not quite perfect so I had to use other items to hide the imperfections (like the John Muir quote mat). The tree border was punched directly onto the background paper (that particular punch is not a chain) and I mounted a bit of cardstock underneath to bring out the tree design. I finished it off with a couple of clusters of stickers from my assorted packs.


This layout is from a DIFFERENT class--but alas I still cannot show you the sketch. I like splitting paper across a 2-page layout and that happened twice here (the light blue and the green forest designs). That technique helps the eye move from one side of the layout to the other. The sketch called for borders under the photos and instead of a punch, I used some strips from a cut-apart sheet. The left border (Adventure) was a bit smaller than the right so I mounted it on a wider piece of paper. But that was TOO pale so I added some rope borders at the top and bottom. A lot more stickers on this one to fill in some of the dead spaces (and honestly to use up some of those sheets!)

Friday, October 22, 2021

And now a word from our sponsor...

 My next stop was Yosemite National Park. I was a little surprised to find so many Subaru advertisements here, but not only do they support the Flower Show, they are working with Yosemite to reduce waste. The floral portion represents Olmstead Point. Also included is the Mariposa Grove sequoia. This California Tunnel Tree is a popular destination within the park.


This layout was created for one of the classes I took and I cannot share the sketch. My layout required some photo manipulation to get the entrance to Olmstead Point in view. Once I trimmed the photos, I matted them in pink and left them square on the bottom to allow a small journaling space. 

The page technique uses "welding" to get both sides of a paper into the act. I liked the contrast between the bright pink flowers and the tree. When you have such a vibrant pattern (the pink flowers) it helps to use it in small amounts on the page. I cut the borders and then flipped the middle. The pieces are reattached using long stickers. I was able to use some very old CM stickers from the Jumbo Great Lengths purple pack. (You can also use strips of scrap paper along the back for the same effect, but the stickers hide the seam).

Following the sketch, I added a border using the Tulips Border Punch from Creative Memories. I think I should have chosen a slightly darker shade of purple for those as they seem to get lost on the tree papers. The rest of the embellishments are more stickers from the GL Purple pack. I trimmed the squares and rectangles into banners to finish the page.

Friday, October 15, 2021

What a Blast

The next display was of Hopewell Furnace. Located not too far from Philly it's another local favorite. As with the Valley Forge display, the creators decided to go with what the place looked like after its original purpose (iron making) was over. The elements such as the furnace were recreated with fall-type leaves. The display was rather large and you could walk through the structures. I liked that they also added non-floral elements such as the pantry supplies.


The layout is based on a class I took and I am not allowed to share the sketch. I used the Hello Autumn collection from Creative Memories. The green and orange colors matched the display perfectly. I liked the portion of the sketch where we punched borders and layered them into a small 4x6 space (see the rustic fence behind the bottom photo on the right page?  Just 2 embellishment clusters here. CM had a matching foiled leaf pack to go with the collection and I clustered them for titles and a little journaling. I also substituted one photo for a journaling box. 

I like that we didn't center the photos in the boxes. It gives a little more movement to the page and shows the background papers a bit better.

Friday, October 8, 2021

It's more than Atlantic City

When most people think of the Jersey Coast, they think of the casinos and not much else. But just inside that commercialized zone is a series of small protected zones like the Pine Barrens and the Maurice River. These were temporarily combined to form the New Jersey Coastal Heritage route--an affiliated unit for the National Park Service. I'm surprised that this was the topic of one of the displays as in reality there is no organizational body overseeing that designation. There is one stamp left in Southern Jersey. However, the areas are protected by private foundations like the various lighthouse agencies. 


The inspiration for this layout was from a class I took and I cannot share the sketch. It was pretty straightforward though--3 pairs of patterned papers cut with the Decorative Trimmer and separated just a bit to create a "river" through the middle. I used more of the Woodland Whimsy papers for this layout as well as a few animal stickers from the pack. It was originally a baby pack so it can be difficult to use some of the titles from the kit. The title across the bottom is a mixture of mini ABC-123 letter packs. The yellow didn't show up well so I outlined them in dark pen. The title isn't SUPPOSED to be another river on the page but I won't argue if you think it matches that layout. I'm just bad at making things straight sometimes!

Friday, October 1, 2021

Of course there's a stamp!

 In the corner, the NPS set up an authentic Ranger Station with real NPS rangers staffing it throughout the show. To prevent overwhelming the Philadelphia staff, additional help was brought in from volunteers across the country. That was probably beneficial as they might have had to field questions about a number of far-flung parks on display.


Creative Memories posted a special sketch challenge for National Sticker Day. They had recently released a second version of the Emoji stickers which had more masked versions due to COVID. I chose to use the original packaging to complete the challenge. It worked so well for this page because it was such a lighthearted topic.I especially love the Indiana Jones emoji--it just seems to go with the ranger page perfectly. The background paper is from the Woodland Whimsy collection. The log paper is some scraps of Adventure I still had. I used the rolling trees border maker cartridge for the edging.

Friday, September 24, 2021

How Green Was the Inn?

 The next display covered one of the affiliated units of the NPS (as if the choice of the more than 400 parks wasn't enough!) The Schuylkill River NHA runs through Philadelphia but goes up into the Pottsville area. They have yearly paddle events along the length. Of course in Philly, this runs right into the Boathouse Row area. This mid-19th century site still runs as a restaurant today in the Wissahickon area.Creative Memories wanted to honor Australia Day which occurs in late January. They posted a blog featuring a cute layout and then turned that into a sketch for us to follow. I used that sketch for this layout--the main feature of which is the circle on the bottom with the 3 tails. I used paper from the Woodland Whimsy pack (the girl's pack I think). That's the background and the darker orange papers. For the circle, I chose one of the circle punches. By starting with a 6" square of paper, you end up with a lacy-trimmed circle. This one had a tulip pattern that I thought went well with the page. I added 2 strips of paper for the tails and then added a border sticker in the middle. A few sticker embellishments from the same collection finished the page.

Friday, September 17, 2021

Boy oh Boy

My next stop was at the Lincoln Boyhood Home. Hard to believe that it is even smaller than the original, but they included an outdoor garden as a main focus of plants.


This layout is from my year-long class so I can't link the sketch. I used several variations on branches to get my rustic look. The paper at the top is from a photo paper pack. By cutting it I could stretch one piece of paper over 2 pages. The brown plaid is a leftover piece from one of the adventure/outdoor paper packs. The borders at the top and bottom are made with different border punches. The top is a border maker cartridge. If you look closely I have the branches facing to the middle to draw the eye there. The bottom is a stand-alone border punch. I chose to leave the branches bare this time because of the split rail fences in the photos. 

I balanced the left and right sides with 2 quotes. On the left is the sign from the display. On the right, I stacked a sticker from an NPS sign sticker pack (all blank) with a heritage phrase from Paper Loft. Just a couple of left-over fall stickers finished off the layout.


Friday, September 10, 2021

Off the Beaten Path

 The next display is of the Appalachian National Scenic Trail--the big one that goes from Georgia to Maine! I've been on very small segments of it and I'm sure there were a lot of options for the designers. They chose a generic-looking walk in the woods but also included one of the sleeping shelters. For through-hikers, this is their hotel on many nights. Also authentic--the white blazes on the trees indicating the path!


For this layout, I broke up a 2-page layout I made at a paper-loft class. It was mostly lantern paper so I added a border of trees from one of the CM outdoor packs (Winter woods--but it doesn't really look wintery). A few more random stickers of backpacks, hiking, and squirrels, and this one was complete!

Friday, September 3, 2021

Dele-Where?

 The next park to be highlighted is First State National Historical Park in Delaware. Which in reality takes the entire state of Delaware and includes several stops. The components highlight the founding of the county as well as its participation in the Revolutionary War, so the designers created a "Colonial Garden". To the best of my knowledge (and I've been through the various sites a couple of times) the only places that you would find this is either Lewes (which as a bunch of historical houses though not part of the park system) or the John Dickinson Plantation. Which I don't remember from my visit there. Still, they put together a lovely display.


This layout is based on one of Organized and Creative Mom's sketches. It's the same page as last week's layout, but the other sketch. I used the very old "Sorbet" line. The stickers are a bit "cartoony" but the background papers worked well. I like using the middle of a frame that  I cut for a different project as the base. 

Friday, August 27, 2021

Cabin Remnants

The display for Valley Forge caught my attention because it highlighted the aftermath, not the actual encampment. Once all those soldiers walked away, the huts would have fallen into disrepair and the flowers and trees would grow in the mulch created by the decomposing structures. 


I made this layout for a contest that Creative Memories held for their Independent Advisors. We were asked to use pens for a layout with creative journaling and drawing. I used some of the collection called "Winter Woods". The log papers were perfect and didn't convey a wintery theme at all. The overall layout was based on a sketch from Noreen Smith for May 2018. You can see that I got my triangle cuts backward, but the theme still worked. 

I used the striped background paper as my journaling lines. The doodling is the leaf/branch along each of the wood triangles. I used the Hello Autumn Journal Template to color in on the sides. I added a couple of clusters from the Winter Woods pack--mostly leaves and trees, again--no real winter scenes. The best news is that I WON. I got a free set of papers, stickers, and embellishments for putting this page together!

Friday, August 20, 2021

Wild Flowers

My next photo op was for a planned garden representing Acadia. Now if you looked at the website for Acadia (I've not been here yet) you would see the coastline, hiking, auto tours. But you might not expect to find a cultured garden! Indeed there is space set aside for preserving the special flora of the area and this display presented that perspective of the park.


If you remember the last layout, I used a Fast-to-Fabulous page as the base. This is the back of that page and it worked PERFECTLY for the layout. I mounted my 2 key photos in the area of the pre-printed mats (CM has since stopped printing mats on the page if you want to try this type of layout--it makes for a very flexible layout). I added 3 clusters of stickers--one near the journal box, one at the left side, and one at the top right (including the title). All of this comes from the Secret Garden embellishments.

Friday, August 13, 2021

The Rustic Look

One area focused not on a specific park, but on the "Rustic Style" used in many parks to evoke a sense of nature while allowing for groups of people to gather. This stage and campfire ring fall into that category. As I visited on a weeknight, I'm not sure if they used this for classes but I wouldn't be surprised. It has a very cozy feel to it.


I didn't go as far back in time for this layout, but I completed it in March using a sketch from my January class. It's always nice to get caught up! I kept with the "rustic" feel by incorporating textured paper. That doesn't mean it is thick, but rather you can see the depth of a photo or textile on the paper. The background page is from the Secret Garden Fast to Fabulous pack. Again, a lovely washed look helped set the tone. I added a scrap of the stone paper down the middle as an anchor for the elements. Although you don't see much of the middle, it is there. I punched 3 circles out of a gray textured paper for the middle and then layered the photos. The embellishments were a mix of Paper Loft (for the title words) and some old CM rustic (or perhaps they were called Rugged?) stickers. I have to say brackets always stump me but I think it worked well for this title.

Friday, August 6, 2021

Home Town Crowd

Of course, Philadelphia had to be highlighted--the flower show is on their home turf! In fact, there is a ranger presence here from INDE which you'll see later. Independence National Historical Park encompasses not just the Liberty Bell, but also Independence Hall, Thaddeus Kosciuszko, and Edgar Allan Poe houses. While Poe will be highlighted at the end, only the Liberty Bell is used to represent the park. Still, the use of red, white, and blue flowers to create the bell was attractive. 


I was finally able to use a sketch from the Scrap Your Stash class in October 2019 (about 18 months before I completed this layout!). Though I cannot show you the sketch, I can say that I followed it faithfully though I turned it 90-degrees to accommodate my photos. There are a lot of different pieces here, but luckily they all had the same tones so they worked together well. The background page gave me the "blue" (I don't recall what pack that came from). The red plaid in the middle is from an 8 1/2 x 11 Americana tablet that I bought when I first started scrapbooking. Nice to be able to use it up! The border is from a pack I bought from Our Memories For Life--a spin-off of the old CM company by one of the original founders. I don't have much of their materials because it is honestly difficult to navigate their ordering page, but these borders were a great find. The Liberty Bell photo sticker came from a pack purchased at the INDE visitor center. The cartoon-like sticker and the other random elements came from an older CM Fourth of July kit. It sounds like a lot, but in the end they all pulled together for a fairly straightforward layout.

Friday, July 30, 2021

The Stones are What Color?

One of the displays at the Flower Show featured Yellowstone National Park. They focused on the way that forests recover from fires with beautiful blooms of wildflowers. They also made a model of one of the hot pools (I think Crested Pool). It didn't shoot water but the colors were pretty amazing.


This layout is based on a bonus sketch from the Creative Memories January Virtual Crop. They don't post it on their blog, just in the Virtual Crop Facebook Group. I used two sheets of Secret Garden Fast to Fabulous pages which had a beautiful watercolor design embedded in the paper as the background. It matched the colors in the hot pool. I balanced that color with some scraps of brown and wood papers. A few embellishments from Secret Garden and it was almost done. I was given a packet of scrapbooking supplies years ago from a National Park Travelers Club Member. I finally got to cut them apart and use one as a title. It meant fussy-cutting, but I think it was worth it.


Sunday, July 25, 2021

Summer Fun

 Hello and welcome to a special edition of my blog. This month I'll be serving as a Guest Designer for Lasting Memories. That blog posts a weekly challenge and then encourages others to play along with drawings at the end of each month. This month's challenges are all Title challenges. This week the challenge was to use the phrase "Summer Fun".

This layout covers the NPTC convention meeting for 2017. When looking for photos to represent Summer Fun there were few better choices! These meetings are not only informative with great speakers and games but a chance to reconnect with fellow travelers and swap stories. We get LOUD when we get together and that's what I hope you see in this layout. This will publish on Sunday 7/25 and we'll be heading to our next event in DC this week (some of my friends are there already). I hope you get a chance to join us, you will not regret it!


I loosely based this layout on a sketch from a class I took. I mixed a couple of different paper packs because I needed yellow and blue to make it work. The yellow is from a pack called "Smitten" which may have been consultant only or free with purchase. It had a close shade of yellow (I really wanted something darker but I think it works). The blue is from Picture Perfect as are the film borders, star borders, and small embellishments. The Smile circle is from Fresh Fusion. I cut the title on the Cricut with cuts from an old CM Cartridge! The hardest part was figuring out the arrangement of photos. Once I figured out meeting on the left and friends on the right, it came together quickly. 

Friday, July 23, 2021

A Night at the Flower Show

In March 2016, the Philadelphia Garden Club hosted their annual flower show with the theme of "America's National Parks" in honor of the centennial. I took a night after work to go down and visit. Because it was the evening I only spent a couple of hours there. I did get to see all of the displays but had little time for extras like vendors. The next few months will be the album pages I created for that ONE night! (Yes, there were enough that it got its own album!)


Creative Memories had created a line called "Secret Garden" about the same time as this visit. I thought that the floral theme would work perfectly with the photos. And to some extent it did, though I used quite a few other collections as well. This is the title page of the Secret Garden Fast to Fabulous pack. The matted white square is part of the paper as is the watercolor background. I used the Cricut to cut the letters. There are 2 layers--purple with the letter cut out backed by black circles. In hindsight, I think I should have just put the purple on the white. It's a little difficult to see in the photo--though in real life it isn't that bad.

The first 2 pages are broken up with the addition of the map I saved. I have it folded around a piece of cardstock so that you can see the entire floor by turning the page. 


I took several hundred photos, but even for me, it was difficult to get decent shots of everything. Even though I was touring in the evening it was still very busy and full of people. That's why I also used a few photos from the internet which were used for the promotion of the show, like the top photo on the page below.


For the left side of the layout, I used a sketch from the January 2021 Virtual Crop. I chose the Hello Autumn paper pack because the colors on display had that rich fall coloring. I cut one of the mats into a circle to add my title. I used up some more of the small letter stickers. I was able to mix and match a couple of sheets to spell out the word. Using a variety of colors not only matched my layout but also enabled me to use up stickers that were hard to use to make standard words. By this point, having any "E"s in a sticker sheet is a miracle! 

The right side of the entrance has ME. That is actually pieced together from several photos. My selfie skills were not very good so I asked someone to take the photo for me. However, they zoomed in on me getting little of the entrance! By piecing it with other photos I took, I was able to get a decent shot of myself. 


The layout here is based on another sketch in the virtual crop which you can see here. For this layout, I went far back in my stash for some "Earthy" power palette papers and stickers. This is a collection I want to finish but it seems to multiply like rabbits when I'm not looking. The CM 12" trimmer allowed me to cut smaller frames of each of the 3 papers for the outside. By cutting holes in the middle you reduce the thickness of the page and the weight of the album. I chose stickers from spring, summer, and winter (the tree) for the border across the top. The journal box is a piece of vellum. It allows the background to come through in a soft way but you can still see the writing. I don't know what made me think of that but it did work well on this page.

I know this is a lot of photos for one post but I decided to put all of the entrance photos in one place. Just behind the entrance shown above were these amazing sculptures of a bear and bison. 


And one more layout from the Virtual Crop. I used paper from both Rustic Manor and Woodland Whimsy here. The die-cut animals are quite old but were a good addition to the page given the topic (OK, it's a moose, not a bison--but it still works).

Sunday, July 18, 2021

Love this View

 Hello and welcome to a special edition of my blog. This month I'll be serving as a Guest Designer for Lasting Memories. That blog posts a weekly challenge and then encourages others to play along with drawings at the end of each month. This month's challenges are all Title challenges. This week the challenge was to use the phrase "Love This View"

This layout features 2 photos I took as I started exploring the Blue Ridge Parkway. On my way, I passed this overlook called "Lover's Leap". Well, who could pass up a stop there? It was a beautiful day and the view of the valley, as well as the farther mountains, was spectacular. I entered the Blue Ridge Parkway and headed to Mabry's Mill. We'll explore this quaint village a bit more later, but this is my favorite photo that I took of the eponymous Mill.


Considering this is a mountain layout, it may surprise you to hear that this is the CM paper and embellishments from "Vitamin Sea". I wanted the blues and greens and was able to find a bunch of embellishments that were generic enough to create my clusters. The bottom border is perfect to carry out the theme of "view" and I was happy to see they weren't colored in like sunglasses. I cut small slits into the border between each pair of glasses so that I could bend them slightly and form the curve. It matches the curve of the title across the top. (The title was cut on the Cricut and I chose a font that would be puffy like clouds). All I needed then was the journal box which had the matching glasses in it and I was done! It took about an hour to make from start to finish.

Friday, July 16, 2021

The Last Park Visit of the Year

My sister invited us to a New Year's Eve party at Mohegan Sun in the Poconos. We agreed and decided to head up early on the 31st, partly so that I could get in one more park visit. Steamtown was not that far away so we made a brief visit and took a ranger tour that included the workshop area. It was nice to be inside on such a cold day, though you can see we started outside at the roundhouse table.


I made the border on the top left page as part of a class I held for my CM business. The basic cuts could be morphed into a bunch of different borders but I really liked using the train version since I had this page coming up. With the border done all I needed to do was to pick 2 train pages from the CM Trains paper pack. There are some decorations/photos embedded in the papers but with enough blank space to add my photos and memorabilia.


The second layout features more of the workshop area. I loved being able to go beyond the "Unauthorized Personnel Keep Out" barrier.


The left page is a Fast-to-Fabulous page from the Gallivant collection. Since I had "wallpapered" the backside it was easy to incorporate into my album. The left border was printed on the page so I just added my photos and a few extra stickers. On the right, you can see that I added a 6x12 peekaboo pocket. In this photo it's covering up the right page, but without being too obstructive. 


Finally, you can see the right page and the inside of the peekaboo pocket.I pieced together photos to be able to show the entire engine. It was a unique experience to see it "naked". I never realized how many layers went into a structure like that.


The border on the right side was scraplifted from this Creative Memories blog post.  Because of the large photos and brochure, that's about all I needed. For the journaling box, I took a circular embellishment and cut it in half to frame the wording. I wish I had made it a little more even, but it didn't worry me at the time.

Sunday, July 11, 2021

Life is Good in the 18th Century

 Hello and welcome to a special edition of my blog. This month I'll be serving as a Guest Designer for Lasting Memories. That blog posts a weekly challenge and then encourages others to play along with drawings at the end of each month. This month's challenges are all Title challenges. This week the challenge was to use the phrase "Life is Good".

I looked through my photos and decided that I would focus on a living history display at Moore's Creek Battlefield, NC. I had stopped here during a 2016 beach trip with Jim's family and enjoyed spending the day looking at the way people dressed, cooked, worked and lived. Many more pages to be added later!


Once I figured out the last half of the title and chose the photos, my next step was the arrangement. I found the journal box. It's from the CM Enchanted line (quite a few years old). I liked the way it had a feel of nature as well as a touch of red to match the people in my photos. I tried to match the green of the journal box with the photo mats. It's a close match but not exactly the same. I wanted a dark background to make the green pop and found 2 older pieces of brown paper. This is from an older travel collection in what CM would have called "Jewel Tones". The title was cut from the Cricut with green letters and backgrounds for balance (love the new Offset feature in Cricut Design Space).

After trimming the photos and arranging them I chose the ones that would get a mat (one short of course). For the unmatted photo, I found another journal box in the same Enchanted line. I fussy cut that small border from it and that balanced the last photo. The round circle on the bottom right is from a pack of laser-cut embellishments. It's green on the other side but not quite a match for the layout. The dark gray/black worked just as well given the frame in the journal box. I added 2 18th century stickers from my Eastern National scrapbook kit.

Picking up on the dark gray/black circle and frame led me to the Infinity Chain border maker cartridge on the bottom left. That is one 12" strip cut in half. The 6" piece is horizontally on the bottom of the page. Then I cut the other side into individual links and mounted them vertically on top. Final embellishments were more fussy cut leaves and branches from another journal box.

I'm creating these layouts while on vacation so I have a portion of my usual stash. It's really making me use up what I have--embellishments, papers, even scraps. Probably a good thing so that I get more room for new products!

Friday, July 9, 2021

On the Trail

Near the Quinault ranger station (which was closed during my visit) was a nature trail--two actually. One takes you to the Kestner homestead and the other is a nature trail. But if you go to the Kestner Homestead you can take part of the nature trail back, so I did both! The Kestner homestead only had outdoor exhibits of historic farm life. I'm not sure if they ever open the house but I don't think so as there wasn't a path to get to it easily.


This layout is a set of pages from a camping class I took with Paper Loft. I thought that the lantern decorations went well with the old-time farm look. Had I used this for camping there would have been more sayings and stickers put on the page but I left it undecorated purposefully.


My final layout for Olympic National Park features the trees seen along the nature trail. Many of them were marked with signs. Their height is impressive and difficult to demonstrate in photos. I thought the hanging moss a romantic touch to the vista as well.


You can tell I was getting to the end of a long scrapping session as the final pages didn't have as much work on them. These pages were purchased from Scrapbook.com, but are from the Scrapbook Customs line. I have purchased quite a few national park sets so you'll see more of these in the future. The only thing I had to add was a mat under one photo to keep it from blending in too much. 

Sunday, July 4, 2021

Celebrate with the Eisenhowers

Hello and welcome to a special edition of my blog. This month I'll be serving as a Guest Designer for Lasting Memories. That blog posts a weekly challenge and then encourages others to play along with drawings at the end of each month. This month's challenges are all Title challenges. This week the challenge was to use the word "Celebrate" as the title. So I chose some photos of a visit to the Eisenhower Ranch. These were taken as part of a National Park Travelers Club Meetup that I sponsored in December 2016. The Eisenhower home was transformed to celebrate the holiday season. That particular weekend featured cocoa and cookies in the visitor center as well. More of that visit will be forthcoming I assure you.


The page I created was based on a sketch from my year-long class (so I cannot post the sketch). Suffice it to say that I had to turn it sideways to accommodate my photos. The background page is a Fast-to-Fabulous page from Creative Memories. All of the items come from an older line called "Season's Greetings". I like the vintage feel to the papers and knew it would work well with the home decor based on the 1960s lifestyle.

Friday, July 2, 2021

Big Trees

As hinted at previously, this part of the world is responsible for most of the world records for big trees. One of the biggest is the Quinault Big Cedar. It truly is massive and I'm not sure my photos gave a grand scale of how big it is. But I could stand up inside the opening at the base if I could get into it! The path up was a bit more rigorous than I had hoped for but it was well worth the effort. Truly my fear was falling on the way back down because it is a rather steep trail.


I continued my work with the CM Virtual crop. This is my take on Sketch #2. You'll notice I don't do all the sketches in order. I don't always have time to start the crop in the workweek so by the time I get to Saturday I have a build-up of sketches to choose from. I like that as I can match the photos to the sketch without "forcing" it too often. I used paper from the S'Mores pack--a newer pack from CM but one that I loved. I had only a partial 2nd page of the boot prints, so I filled in the gap on the left with one of the tall trees from the Eastern National Scrapbook kit. While I'm fairly sure that die cut is supposed to be redwood or sequoia, it gave a little authenticity to this layout. The CM tree border maker cartridge is an old one, but the perfect addition to the layout. The green helps break up the brown tones.


Two other "Big" trees to highlight are the large Sitka Spruce and the Big Leaf Maple. If you look on the right page you'll see that I tried to give a perspective of that maple leaf by photographing it next to my foot. These trees are plentiful in the area and my rental was awash in giant leaves.


Sketch #4 was the basis for this layout. This time I got to use the brand new Hello Autumn collection. The photo of the maple leaf really set off the design. I love the paper in this pack that is a jumble of autumn leaves. It's not quite textured paper that looks like another photograph but the colors are quite vibrant. 

Friday, June 25, 2021

The Quinault Auto Loop

 On Sunday morning I started visiting the Quinault portion of the park in earnest. An auto-loop road started near my hotel so after I checked out, I drove toward the park entrance. On the way, I saw a beautiful sunrise and stopped at the side of the road to take photos. It wasn't very busy along the road. My "friend" came over to the rail near me as I was taking photos and so I snapped one of the horse as well. I think he wanted food but I didn't have anything for him, unfortunately.


While I did create this page during the CM Virtual crop as I had been doing in the last several instances, the inspiration page was much older. For the April 2018 crop, I didn't get all the pages completed so I just saved the sketch. This is my take on the triangles. I used a zig-zag border maker cartridge for the 2 long black strips. The background page with the vertical triangles is from Woodland Whimsy. The blue denim paper is from an old blue-themed paper pack from CM. The journaling is on the next page.


My journey took me across a wooden bridge. Again, since I was nearly the only one exploring, I could stop and take photos. I stopped at one of the nature trail stops for the waterfall photo. It was so peaceful I felt I could stay there for hours. But I had more exploring to do as you'll see next week.


Back to the October 2020 virtual crop, this page is based on Sketch #5. I used some scraps from several packs here including a travel pack. The black buffalo plaid is from the Scenic Route pack. But the rest of the accents and the woodsy paper came from the Explorer pack (which was nearly completed by this time). I used the Custom Cutting System to make the circles. For the green dot paper, it is the inside and outside track of the same circle. Thus I get 3 rings with 2 papers. You can see a bit of the denim paper on this page too which helps tie the left and right pages together.

Friday, June 18, 2021

Inside the lodge

The outside of the lodge was amazing. And then you step inside and it's like going back in time! This lodge has a rustic yet sophisticated feel to it. The bedrooms have old-fashioned claw-foot tubs and the lobby is meant to serve as the communal living room. There was a fire in the fireplace and some extremely comfortable leather chairs. I will definitely return for a longer visit.


This layout is from challenge #6 in the CM Virtual Crop from October 2020. I combined elements from 3 different Creative Memories packs. But the best part of the layout (in my opinion) is the border I used where the 2 background elements meet. This is a branch border punch. I chose it because it had a nature theme to it but also because the branches reminded me of the animal head hanging above the fireplace (and in my sticker). The dark brown cardstock draws the eye to the border. 

I chose to substitute one of the 6x4 photos for a large journaling box. Because I did that, I had to find filler for the bottom left and upper right corners. I chose to fill in with sticker clusters. The bottom left is a signpost I created myself from several sticker pieces. I mounted it on lighter paper so it wouldn't get lost in all the brown of the background paper.

Friday, June 11, 2021

Lodge Front and Back

I made it to my hotel--the Lake Quinault Lodge. It's a historic hotel right on the edge of the National Park boundaries. This is the front of the lodge and the photo below is behind the lodge. I was most impressed with the redwoods near the entrance.


I based this layout on a sketch in the October CM Virtual Crop. I used paper from the Explore pack including some small paper borders from a cut-apart sheet. I liked the woodgrain background because of the tree photos.


In the morning I was up early and was able to go down to the lakeside behind the lodge and grab a few photos. The birds were cooperating with me and I got a few choice shots.


This is sketch #3 from the same CM Virtual Crop. There are a variety of paper and sticker packs here. I group my supplies by theme so I could just browse through my "nature and camping" folder for pieces that would work.  I used a lot of blue tones for the lake feel. The rounded piece is a circle that I cut punched around the edges. I used the Cloud border maker punch without the straight guide. I just free-punched all around the edge. By turning the punch upside-down I was able to match up the edges for a smooth look. 

Friday, June 4, 2021

Water Water Everywhere

 After leaving Hurricane Ridge, I started driving around the park heading to my hotel for the evening. I stopped at 2 additional locations. Though neither of the stamping centers were open, I was able to see more of the diverse landscape of this unusual park. On the left is Crescent lake and on the right is the beach near Kalaloch. Both were along route 101 as I was driving and well worth the stop.


This layout is really 2 individual pages and yet they are connected by colors. I started with the left page and chose the elements based on a challenge in one of my yearly scrapbooking classes. We were given a chart and had to choose 2 different papers (one from each of 2 lists), a technique to incorporate, an add-on, and a word style. I chose: Paper 1: overall washed/textured look (this is the background blue), Paper 2:cardstock (for the mats), 3) technique: fussy cut (I fussy cut the wavy border along the bottom); 4) add-on: journal card; and 5)word style: Die cut words (the "perfect spot" and "spectacular view are from Paper Loft word sheets). Many times when I see those lists it is daunting to find things that relate but this one came together fairly quickly.

I then chose similar tones to have the beach photos match (same family for the background paper, same cardstock mats and same word die cuts). What you probably didn't even notice is that both papers were from a time when Creative Memories had pages that were slightly under 12x12 (for whatever reason they were 12" x 11.5"). They made "perfect fit paper" (of which these papers are examples) but it is sometimes hard to use them on our newer true 12" pages. So I cut strips from the same paper family and filled in the "gutters" along the outer edges. If you look closely you might see where they fit.

Monday, May 31, 2021

Exciting News!

 A small break from my usual posts to let you know that I've been chosen to be a guest designer for the Lasting Memories Scrapbook layout blog. During the month of July, there will be extra pages posted to this blog as I participate in their challenges. You can follow my progress here or on their blog. I hope I can complete all the challenges with the National Park pages but you may have to excuse something a little more personal during that time. This is my first time being a Guest Designer and I hope it all goes well! I was chosen based on my submission of this layout back in April.