Google

Showing posts with label Convention. Show all posts

Friday, November 24, 2023

2018 Convention Part 10--Food and Fun

During the convention meeting, we had a short break where we served cake and punch. I also had my scrapbook on display so people could look through it (I think it was the 2016 convention from Philadelphia). 

The left page above and the right page below are the 2 sides of one layout which you can see here. Scroll to layout #2. I was making these pages while on vacation so continuing to use the nautical theme even though it's not truly nautical photos because that is all that I had with me. I used some of my Graphic 45 papers from an old line called "By the Sea". I added some CM papers that coordinated so I could get the mix of the blues and the reds. Otherwise, it would look like someone bled all over the pages! I wanted to include the program/Stamp Pad so I needed to use a pocket page. That gave me a little more room on the back to add more dinner photos below.

After the meeting, many of the attendees attended the President's Dinner. We were fortunate this year that one of the superintendents came. As the president, I asked him to join my table, and I enjoyed our dinner and talk.


By the time I got to the back of the pocket page, I was running out of scraps! I ended up trimming this blue gingham into 2 rectangles with a small gap between them since it would not cover the entire surface of the cardstock. The note cards I used for journaling were from a pack that I won in a different Graphic 45 contest.

Sunday, July 25, 2021

Summer Fun

 Hello and welcome to a special edition of my blog. This month I'll be serving as a Guest Designer for Lasting Memories. That blog posts a weekly challenge and then encourages others to play along with drawings at the end of each month. This month's challenges are all Title challenges. This week the challenge was to use the phrase "Summer Fun".

This layout covers the NPTC convention meeting for 2017. When looking for photos to represent Summer Fun there were few better choices! These meetings are not only informative with great speakers and games but a chance to reconnect with fellow travelers and swap stories. We get LOUD when we get together and that's what I hope you see in this layout. This will publish on Sunday 7/25 and we'll be heading to our next event in DC this week (some of my friends are there already). I hope you get a chance to join us, you will not regret it!


I loosely based this layout on a sketch from a class I took. I mixed a couple of different paper packs because I needed yellow and blue to make it work. The yellow is from a pack called "Smitten" which may have been consultant only or free with purchase. It had a close shade of yellow (I really wanted something darker but I think it works). The blue is from Picture Perfect as are the film borders, star borders, and small embellishments. The Smile circle is from Fresh Fusion. I cut the title on the Cricut with cuts from an old CM Cartridge! The hardest part was figuring out the arrangement of photos. Once I figured out meeting on the left and friends on the right, it came together quickly. 

Friday, January 22, 2021

Happy Trails part 20--the Convention!

The convention starts with registration. One of the most important tables to stop by is the stamping station. The club creates its own stamp, plus an iconic stamper for the park. We add those to the park's commonly used stamps and the tables get BUSY! I snapped a few folks in their stampmania. It's always interesting to see how everyone does their collecting--some take multiple images on one page, some have multiple books, some want specific impressions. There's no wrong way to stamp though.


This layout was created at a Paper Loft class at a Lancaster scrapbook convention. It had been in my stash a while, and I had to move the banners on the right page because my cat had found the edge delicious (there were tooth marks left in the paper!). I added a few strips of paper (the pine cone strips are leftover from a paper in the Eastern National scrap kit) and some Cricut cuts of the rubber stamp. A couple of stickers from the Junior Ranger sticker pack and a passport sticker (not what we usually use, but it was blue and said passport so I went with it) and the page was complete.


You may think the pages don't quite lie next to each other. I had to take 2 photos and stitch them because between them is a pocket page holding my copy of the program from the day. I grabbed a couple of photos during the convention. One of our speakers was the superintendent and I found a photo of her from outdoors to include. On the right are photos with several club members (including me) with the park's mascot--Chami the Chipmunk.


This layout is from Club Scrap's National Park kit. Scroll down to pages 7 and 8 to see it without photos. I spent a day putting a bunch of these layouts together and was excited to be able to use them. I bought a few sheets of paper from the club as part of a clearance sale. Later, I had scoured the eBay and Facebook group postings and bought some leftover packs of paper as well--enough for me to put together the layouts, cards, and even a few extra pages not included in the original instruction pages. Because my first layouts were made before I realized the cutting guides were on their website, I had to make a few edits to which embellishments were placed on each page. But, they work for me! Especially the quote about laughing).

The final pages of the convention take us from the break (and the fabulous cake the club was able to get) through the President's dinner and a quick shot of one of our members who joined us at a Karaoke bar after dinner. The group photos were taken by multiple people so I'm sort of standing to the side instead of in front of the group. (Also why you won't find me in the photos!) 


The final pages are another pre-designed layout. This set was completed at a local scrapbook store. When I lived near Harrisburg I would drive to the store once a month to complete a layout. I have to admit I never knew what I was going to use this one for. "Sippin on Sunshine" and lemons didn't seem to apply to any of my usual summer photos. But I decided that I would pull it for the break/dinner photos and it doesn't "wow" me, but the pages are completed. And the lesson of this set of posts is that it is GREAT to take time to put page layouts together in anticipation of using them. But at some point, please remember to take them out and put photos on them! 

Friday, June 14, 2019

Newsworthy

We made the newspaper! On Saturday we held the convention in a meeting room at one of our hotels.

For the news article, I found a background page that was newsprint. Oddly enough it came from a tablet of Christmas papers. I had a couple of 5x7 photo sleeves to preserve the actual newspaper. Creative Memories products are great at protecting from the high acid content found in newspapers. Keeping them in these protective sleeves will prevent decay from leaching to other parts of the page. I'm hoping it also keeps them readable for many years. You can also scan newspaper and use photos of the page to keep stories.

On the right page, I used my handy sketch seen in previous weeks but used only the left hand side. I only had the 2 photos (one of the convention and one of the hotel welcome sign). I used my nametag and a journal box for two of the right hand elements and then dug out a tag and used a couple of ranger stickers from the EN pack as an embellishment.

Friday, October 26, 2018

Centennial Part 5--The Convention

On Saturday we held our convention. Most of my morning was spent setting up the venue with our new banners and getting things out of the cars. We held the meeting at the Arch Street Quaker Meeting House which is an historic venue. Translate that to "no air conditioning". It was a hot day and we only had fans to cool ourselves, but it was still a great meeting.

Above shows that I inserted a portrait sleeve to add the Convention Stamp Pad. We're using this as our program now, and you'll see below why it didn't fit on the page. That is mounted on the black cardstock that comes with the sleeve which left the back available for more photos and memorabilia.


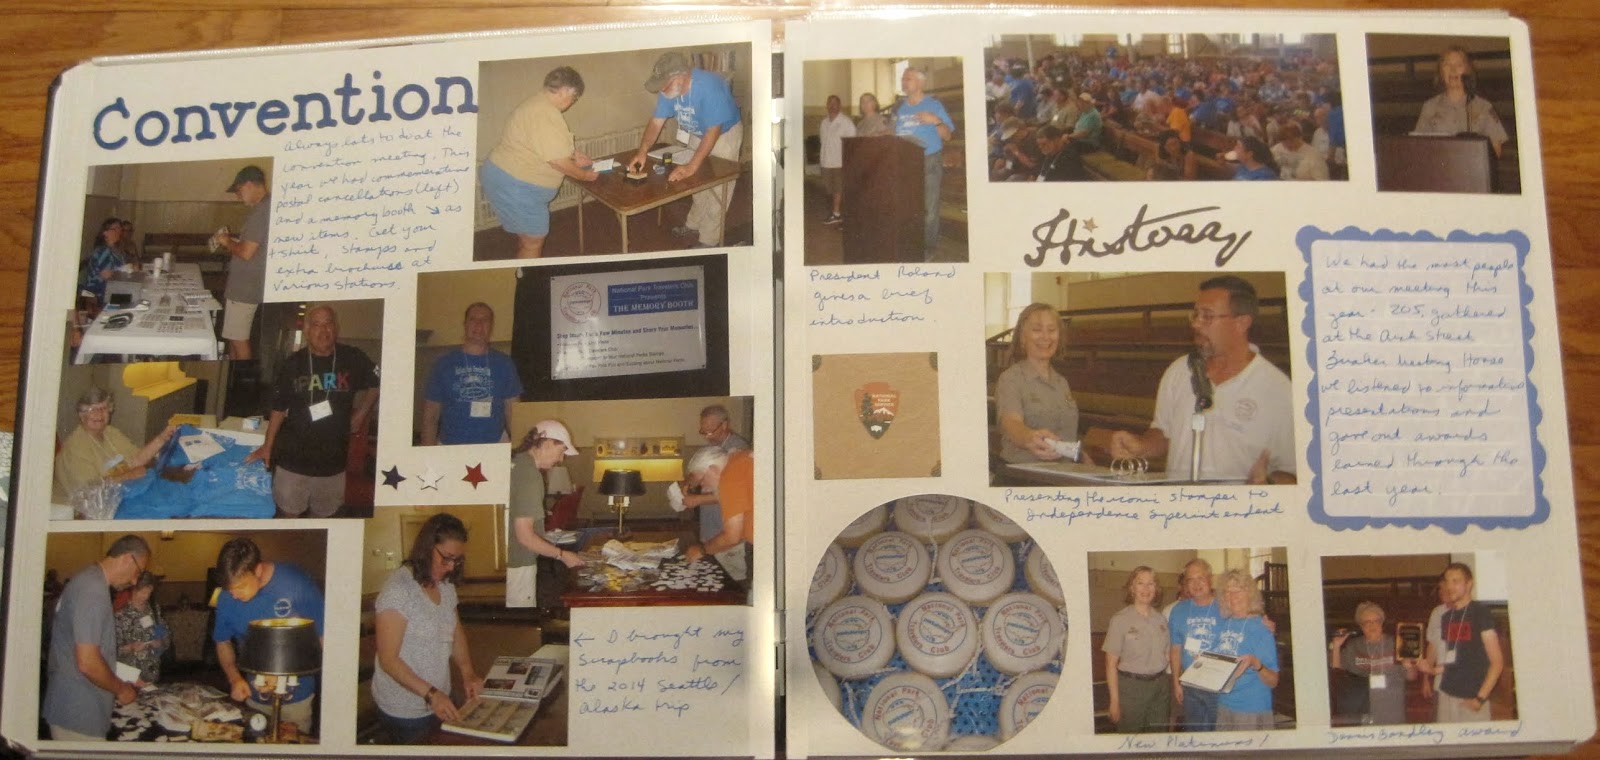
When you work with dark colored paper you have 2 choices for journaling--you can either use a separate block of paper, or you can write directly on the page with a gel marker. I recommend either white or silver though gold works well too if you are writing about a special event.

For the 2-page layout below, I was playing along with the Creative Memories Virtual Crop (Here is the challenge blog page.) They wanted to focus on photos and challenged us to use more than 12 photos on a 2-page layout. This is what that might look like! (It's actually 14 photos!)

The first thing to do when trying to put multiple photos on a page, is to start cropping! When you look at a photo you'll notice that there is probably a bit of extraneous stuff along the edges--ceilings, too much sky or grass, or even people you aren't focusing on.  Feel free to trim them off! (May I suggest the CM personal trimmer?) I also cropped a photo of a plate of cookies into a circle. It keeps the shape of the item and reduces the size of the photo. You'll notice I didn't mat any photos. If you review the blog page, that certainly isn't required but a lot of it depends on how small you make your photos. I layered photos which also helped place more photos on the paper. If you've cropped the edges but you have subjects of unequal height (like the middle photo on the left), you can probably cover that area of the photo with another.

If you are planning on putting multiple photos on a page, you can also print your photos smaller which decreases your need to crop. Whatever you do, leave some room for journaling. The mass of photos won't make much sense if you don't tell who is in the photo or why it was important to you! And don't forget that now you can use the Creative Memories Peekaboo sleeves which are an easy way to add photos on top of the photos on your page.

After the meeting ended, the president's dinner began at the Dave and Buster's nearby. We celebrated not only the 100th birthday of the National Park Service, but the 80th birthday of one of our members!

This layout is another example of splitting a kit. The left page is one of a set of 2 I purchased as a premade layout. I have no Idea what the "Q" was supposed to represent, but I left it on the page as decoration! There were just a few photos of the participants and I was able to layer them to show most of the room. On the right is a 1-page layout I made at one of the scrapbook conventions. It demonstrated the use of Washi tape. The candles are all made of colored washi tape with gems for candle flames (Yeah, I don't like using gems but hey, I paid for the class so I'm going to use the page). The middle of the page is a 10" square which has a border of the Washi tape. The flower was also made by folding tape on itself and layering to create a flower shape. The center is another gemstone which hides some of the folding.

Lastly, after dinner we got to spend some time in the arcade. Jim and I each have our own preferences for games. He is more shoot-em-up and I go for arcade games like skee ball or video dancing.

This was a fairly simple layout. I have 1 photo mat and a corner triangle to pull in the blue to the page (also used blue pen for journaling). The lower left corner are just a handful of small bits cut from various papers I have on hand. Did I mention it's "SCRAP" booking? ☺

Friday, July 6, 2018

At the Convention

Saturday morning I drove to the visitor center in Ashland to look around before our meeting. It's a rather new building but already has nice displays. You can take an elevator to the top floor to look out on the surrounding area. That's what you see in the 2 photos on the right.

This layout is one of the 1-2-3 sketches by Noreen Smith. She has a lot of ways to take 1 piece of double sided paper, 2 scrapbook pages (or cardstock backs) and with just 3 cuts of the trimmer, you have everything you need to decorate the page. If you look at her sketch, you'll see I didn't use the banner cuts on the right page. But I was able to use the unigrid and the park entrance sign to completely fill the space between the coral papers. It really helps you stretch your supplies! Likewise, on the right I used the center brochure and a journaling square to fill in the left side of the page. I added a couple of stickers to the top left and the page was done in a flash!

We had lunch in the center and then started the meeting. On the left page is the registration area and on the right are a couple of photos of our speakers.

This layout is part of the 2017 Creative Memories National Scrapbook Day pack. Each year NSD is celebrated on the first Saturday of May and around that time, Creative Memories offers special themed papers and project recipes. I don't have a copy of the recipe used for this page, but check with me about a current offering! I know one complaint people have about pre-designed layouts is that their photos don't "fit" the design. But you can see here that I simply use the photo mats as part of the background. Although some do fit as indicated (like the 4x4 photo in the bottom right) others extend off the mat or I use them for journal squares. You should always make a layout work for you, don't feel you have to adjust your photos to the page.

This year our break during the meeting turned into a party! I was thrilled to see Smokey the Bear usher in the cake!

I went pretty simple for this page. I thought the brown background fit the bear theme. The bear in the corner is an old Mrs. Grossman sticker that I still had and I topped him with a Mrs. Grossman party hat (which is probably just as old). A mat and a journal box are the only other embellishments for the page.

Friday, February 2, 2018

Convention in the Capital--part 1: The annual meeting

In early August 2011 the National Park Travelers Club held their 9th annual convention at the National Mall. Jim and I drove down after work Friday. Saturday morning I helped with morning registration before the event. There were several speakers (including me as a surprise fill-in for someone who canceled).


I think this layout turned out well. I scraplifted it from this layout that I found on pinterest: Left pageRight page. I had some blue striped paper for the top and left side, and I had a piece of 8 1/2 x 11 with stars and banners for the split in the middle. I chose red mats instead of white and I think that helps set off the photos over the white background better. My stickers and die cuts included my name tag from the event. The title was cut with the Cricut using one of the free fonts on the machine.

Friday, January 19, 2018

Northwest Adventure part 15--the last entry

Saturday was the final day of our trip (we left VERY early Sunday morning). The convention took up the afternoon and evening for us.


Here we are at the last page of the album. The left page is nothing special--just taking the red/white/blue theme from the cake and using the paper and journal box for the page. This is actually about the right side, which is the back cover to the album. I was working on this at a craft house (a place where we can REALLY spread out and stay overnight so our tables don't have to be packed up all the time). I got to the end and realized I didn't have a place for the convention program. I couldn't even put in an 8 1/2x11 sheet protector because I didn't have anything for the back. So I initially threw it out. I went to bed that night but woke up with an epiphany! Why NOT put something on the back cover inside? What else can you use it for? So I did, and there it is. I'm glad I threw it in a box for recycling so there was not a stain or crumple on it before I took it back out.

And there is the last entry for this adventure. Beginning next week we'll return to the chronological entries from 2011.