Google

Friday, March 18, 2022

On the Mall

After lunch, I stuck around to take a tour of the tidal basin. As we passed the NPS Information booth on the mall, we were disappointed that it wasn't staffed and the stamps were locked away from us! I stopped for a moment to take my photo with the Washington Monument. It was being renovated during my visit so I was unable to go to the top.


This page is a leftover sketch from a summer camp. The main idea was to do some stitching. While the class leader advocated using real thread, I stuck with faux stitching. I outlined the banner by holding a ruler against the edge and dotting every other block along the path. Then I free-handed the cross-stitch look along the bottom. I used a bit of my non-CM stash here. The background paper was just shy of 12x12 and I don't know if I bought it that way or if I trimmed it previously. I layered with the grid paper so I could do my stitching and then cut a scrap of light blue for the banner. I used some star and heart stickers from various sticker packs. The title is from a Paper House sticker sheet. Does that make too many monuments? (2 photos and a sticker). I don't think so!

As I usually do, I visited the WWII memorial briefly. I managed to find someone to take my photo with one of the title pillars but strolled along the outside mostly. 


I bought this kit from Scrapbook Concierge. They create elaborate layouts that you buy as a kit and assemble at home. They look straightforward, but I always end up looking at some pieces and saying "What do I do with this?" For this kit it was the small gray rectangles. It turned out they were to create shadows on the pillars around the reflecting pool. I really had to concentrate on aligning them from smallest to largest and matching the left and right sides. While I like their layouts they don't leave a lot of room for photos, though I was able to add one more by covering some of those pillars. I don't always use the photo corners provided but I did like them here. I used one photo spot as a journal box so I was able to get all the components I wanted included.

Friday, March 11, 2022

A day in the Life

Our tour downstairs included the space used as an office. It was a large 4-person desk and there were typical office supplies still in evidence. My favorite were the stamps. I wonder how many Park Traveler folks are disappointed that these particular stamps do NOT go in our passport books! 


I used the remnant of an Archivers paper (I used the left side on the New Castle courthouse page) because it had the typewriter on the bottom and that went well with the office theme of the page. I then included the phone and typewriter die cuts and some old stamp stickers I had. It's a fairly simple page but highlights the important work done here.

Upstairs is one of the bedrooms Alice Paul used. You can still see her dresses and correspondence ready to go! You have to wonder if they knew at the time how important their legacy would be. No one really knows how much influence they have on others. You just have to keep working at what you believe in!


For Earth Day, CM hosted a special challenge that would help use up scraps (a sort of focus on reduce, reuse, recycle). One of the sketches was this mosaic pattern. The original video had various papers abutting each other and then using thin strips of black cardstock to create the "leaded" effect. I decided to try a variation. I used a black base page for the layout and then used a technique that Noreen Smith showed called "Crazy Squares" spacing the pieces so that the black showed through. There are some uneven pieces but I like the way it turned out. I was able to use up strips of the Reminisce line from OLD CM. The tones of the page went well with that paper.

Finally, we went outside and took a group photo. It was a pretty good-sized group! Afterward, most of us went to the Museum of the American Indian which was said to have a great cafeteria. My lunch was fabulous and I even took a photo of it! Though we went our separate ways after lunch, my time in DC wasn't done. Look for more of this trip next week!


This page fulfilled my April challenge for my monthly scrapbook class. We were given a tic-tac-toe page and I chose a diagonal with Purple, Stripe, and die-cut. I think I may have cheated a bit using purple striped paper (from a special pack CM had recently released) but I like the monotone look of the piece. The die-cut is the title and although it was from a different collection, an older travel collection, it matched the tone of the paper so I used it. I was impressed that I even found a "Circa 2016" sticker to include in one of my groupings. I like that I was able to include 2 rather random photos on one page. I was really impressed with lunch that day and was glad to include it.

Friday, March 4, 2022

Women Warriors

How appropriate that March is Women's History Month and my first blog of the month starts with the Women's Suffrage Movement!

Perhaps you have heard of the Sewall-Belmont house? Up until 2016, that was the name of this house. The National Women's Party, who had owned the house, donated it to the National Park Service and through a Presidential Proclamation, the new unit was formed. They changed the name to Belmont-Paul to highlight the work of the NWP crusaders. Several members of the National Park Travelers Club met there in April to see the new unit. We began our tour in the main entryway (though you don't come in the door under the stained glass transom) and you can see all of the busts and statues of prominent women in the suffrage movement.


This layout is based on one of my year-long class sketches. Since I didn't have to use CM papers, I used Paper Loft and Graphic 45 for the components. With the door, I thought the old key paper was a good choice for the layout. The box on the upper left is actually to be used for genealogy or family trees, but they make great title boxes. The title is from one of the CM die-cut sentiments packs. I've been turning to them more frequently.

Throughout the house, they have included "Selfie Stations" in mirrors. I tried to take advantage of them though you end up getting caught with the camera in front of your face. There are plenty of historical items such as banners and sashes used for various marches. They are kept in great condition considering the use and age of the items.


This layout is based on a bonus sketch for the April CM Virtual Crop. Bonus sketches tend to appear on Monday and you have about a week to put them together (vs. the weekend for the actual crop). But because they don't post the sketch on the blog, it's harder to link. For this sketch, I did upload it to Pinterest so you can see it here. The paper is from the CM Reminisce line--a rather old collection. Because they are so decorative I find them hard to use. I ended up cutting the decorations off the original pages and rearranging them into a semblance of the sketch on 2 background pages. I used mats to punch the embellishments or to create ribbons.

Friday, February 25, 2022

New Castle

The next morning I drove to New Castle. The weather had brightened and you couldn't tell it had snowed! My stop today is at the New Castle Court House. Like the one in Dover, the main room held trials. But over the years it has had many uses, including a teahouse at one point. The upstairs rooms were used by state workers such as the Register of Wills. During the renovation, the original titles were found on the doors!


This layout is from one of my classes. And I found the error in the directions, unfortunately. The argyle paper should have been cut 1/2" longer so that the photos on the right were slightly matted. I don't have much more of that paper (Archiver's I think) so I left it as-is. I fussy cut a few embellishments to go with the page but didn't embellish too much.

Also upstairs is an interesting history of a slave who was caught escaping and imprisoned. But he was "purchased" by abolitionists who were able to complete his escape. You can see that the Underground Railroad was a large part of my trip. There are now special stamps for this program and the middle of the 2 pages below is a local passport pamphlet that I began to use.


Because I knew I was putting the brochure between these 2 pages, I was able to do different papers and styles. It's NOT a 2-page layout, I just photographed it that way. On the left is another of my class sketches. The photo makes it difficult to see but the paper is pale blue and from an old Vintage Chic line. I had an extra photo spot, so I added a mat card as a title. I added a couple of flourishes by punching scalloped circles in coordinating papers.


The right side isn't following any specific sketch. I had a remnant of old brick paper which I cut diagonally and added to the corners. The swath of page between is a good place for journaling. I added a few random square stickers and a "History" title from one of my Paper Loft sheets. The postcard included details of the slave story I mentioned above. But just because you can read it here, don't let that stop you from visiting!

Friday, February 18, 2022

Does Mother Nature Check the Calendar?

My next stop was at a State Park office which is close to the official sign for the new park. I could NOT believe it. When I arrived it had started SNOWING. in APRIL! And while not a blizzard, it was heavy enough to lay on the ground and make things a bit slippery. 


So when I pulled out my winter papers, I found the mat card that said "No Winter Lasts Forever" and I used that as my jumping-off point for the layout. I chose a sketch from my year-long class with a very simple arrangement--a central square of decorative paper and a contrasting stripe at the 1/3rd mark across the page. I was using CM's "Winds of Winter" pack from a couple of years ago. A few swirly stickers to enhance the feeling of wind-whipped snow completed the page.

When I went inside the park office, I found that they had a viewing area in the back and had lots of bird feeders set up. With the snow, birds were taking advantage of the buffet and I sat for about an hour taking in their movements. There were also books and charts to help identify the birds. Most are goldfinches and their bright yellow was a nice contrast to the snowy background.


For the left side of this layout, I used sketch #1 from the CM April 2021 virtual crop. The instructions included making a "custom" peekaboo pocket--less than the 6" wide pocket you can buy. The technique is shown in the video on the link above. It was fairly simple and I was able to follow the directions, though I'm not sure how often I will use that technique. But it allowed me to add a LOT of photos of the birds. Plus the photos were 4x6 but the birds typically took up just a fraction of the photo so I could also crop them into circles for the edges. You can see the inside of the pocket below. I used the newer collection called "Winter Woods" from Creative Memories. I loved the snowy trees--so perfect for that day! The embellishments included some birds on branches so again --PERFECT FIT!


For the right hand side of the layout (the 2nd photo, not the one above here), I used sketch #6 from the April Virtual Crop. It created a nice balanced 2-page layout. Such a large amount of "real estate" meant that I could add more mats and other embellishments to my page, so it's pretty well decorated. 


Friday, February 11, 2022

Old Swede's Historic Site

 After I was done at the Dickinson plantation, I drove to Wilmington. The weather had turned a bit colder and rainy but was still manageable. There are 2 structures at the site. First is a home that served as one of the initial settlements in the area (Fort Christina was the original name). There are a couple of rooms on the first floor to explore. I had a private tour with the docent. After the home (and the stamps) we walked out to the cemetery of the neighboring church. There are very old graves here. You might be able to see the date 1699 made of colored bricks in the church wall.


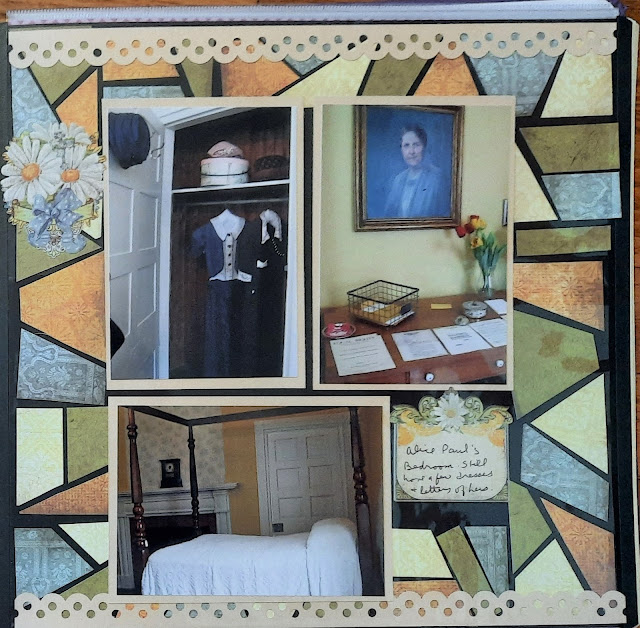
These 2 pages go together but were formed by 2 different sketches. The page on the left is from sketch #4 in the CM April virtual crop. I turned the page 90-degrees to the right because I had more horizontal photos. I substituted one of the mat cards from the pack for one of the photos. I thought the title on the card was perfect for such an old homestead. This layout uses materials from the Memoirs and Memories line as well as a few other odds and ends from my stash.

The sketch on the right is from sketch #3 in the same crop. When CM posts the sketches, 3 are published on Friday afternoon/evening and 3 more on Saturday. I generally wait until Saturday morning to start cropping which means I have more options to choose from when putting layouts together. That's why sketch 3 can come after sketch 4. I was able to use a LOT of scraps on this page. The background paper was chosen to highlight the bricks of the church as well as to provide a place to contrast the brown and white of the few last pieces of the Archivers line from CM. I carefully measured the spaces I needed for my photos and trimmed paper and mats to be the background and the filler "bars". I liked that I had 2 small title boxes together to fill in the bottom right corner. That was a great place for the title sticker (though unusual to put it on the bottom).


Next, the docent took me inside the church. It reminds me a great deal of Gloria Dei in Philadelphia (and was of course by similar colonists). Having a lot of use over the years there are a lot of historical objects such as the original door key and the graves of those laid under the church floor. This parish is still in active use.


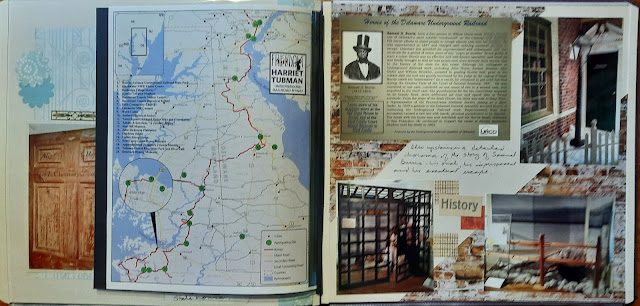
This layout is another from the CM virtual crop, sketch #5 this time. Given the theme of the photos, I turned to 2 newer packs from Creative Memories--the Graceful Theme pack and Keep the Faith papers. These 2 packs had some delightfully rustic wood and of course, had some religious stickers. I hadn't originally planned to keep these for myself but it turned out that I had use for them! The border of the 2 pages is a bit tedious to make and yet whenever something like this is proposed, I jump in and do it. The papers were cut into 3/4" strips and then cut into different widths to arrange the tiled look at the top. Because the papers are double-sided, I could mix and match even more as I built the border. I cut new papers for these, but these types of borders are great ways to use scraps!


After we explored the main part of the church, she took me to the bell tower and I got to ring the bell! It's a little tricky to get the spacing of the pulls just right to keep it pealing but I was able to get it done! I had the docent take my photo while I was doing it. They're a little blurry but I love them!


My last page of this visit used a sketch from my monthly class so you can't see the original sketch. You can tell it wasn't from the CM crop because there are no CM papers on here (other than the journal box). You have to use CM papers in their virtual crop if you want to win (which I never have) so I look for opportunities to use the rest of my stash with the other classes and challenges I try. You can see it's a simple layout--a 10" square in the middle and a wider paper across the page which also serves as a photo mat. I used a plain scrapbook page, so to give more interest I doodled some stitching around the border. I used a straight edge to keep them aligned but just dropped a mark wherever I felt it was needed. The bells are my favorite embellishment. I had a Pinterest pin with "Punch art" for bells and I used the custom cutting system to make the ovals and colored them in with marker to make the clappers. Since you can't see the bell in the photo I thought it was a nice way to include them!

Friday, February 4, 2022

Delawarean or Pennsylvanian?

 I backtracked a bit to visit the Dickinson Plantation. I had known him as a Pennsylvanian and of course the impetus behind Dickinson College. He is best known as the Penman of the Revolution. But his home was in Delaware. And that's after the 3 lower counties broke from Pennsylvania to form the state. So my tour was an eye-opener in several ways. The tour started in the visitor center with a video and then we walked to the house. The home is reminiscent of the 1700s and I loved the manikins of the Dickinsons included in the rooms.


I based this layout on a pin I saved from The Paper Loft. I did use Paper Loft papers for the background but didn't have the exact pages so I had to create the scene. The background papers had a solid print all over, so I "gutted" the middle to make a frame and then just mounted them on the scrapbook pages. With the new CM trimmer, it's easy to do and I have a video of it on my Facebook page (around 10 minutes in). That saves paper for another use!

I used a Cricut to create the tree and house. I used green cardstock for the doors because the house does have a green door (used to indicate the wealth of the people living there). I flipped the tree and house from the original layout because of the way the photos fit. That provided me with an opportunity to add the horse and carriage die cut from Paper Pizazz (now out of print). The small image of a woman and child on the right page is from the same die-cut tablet.

The tour moved into the servants' areas such as the kitchen and included a stop in an outbuilding that featured some old weaving looms. As I worked a loom during my Art Club days in Junior High School, it brought back a lot of memories.


This layout was based on a sketch from the April 2021 CM Virtual Crop. I chose to use some VERY old stash from the Earthy line. I thought the dusky prints worked well with the heritage photos. The left page had the border of diamonds printed on it. I just had to add a circle cut from a scrap and a couple of stickers from the pack. On the right, I used the top circle to do some extra journaling. The bottom circle on the sketch was completed with a sticker. CM used to make pages of decorative shaped stickers (circles, tags, rectangles) and I didn't know what to do with them. I do now!