Google

Friday, May 11, 2018

The Roosevelts

After leaving the George Mason memorial, I made my way around the Tidal Basin to the Roosevelt Memorial. Never having been there before I accidently entered at the end and viewed all the rooms backwards!


I didn't really know what to do with my lone photo of Eleanor, so I decided to give her a solo page. The background is one of the Gallivant fast-to-fabulous pages. I rooted through my Eastern National materials and found the die cut of Eleanor and the 5x7 card on the left. I suppose the card could have been a photo mat, but I thought it also worked well as a journal box. The same image of Eleanor is on the card so I thought it worked well.

OK, on to FDR. The monument is divided into rooms representing his 4 terms. Each is filled with symbolic statues and some sort of water element.


The left page is the back of the fast-to-fabulous which I really liked. To make a match on the right I found a piece of gray paper for the bottom and a red and gold remnant for a top border. The yellow mat under the photo also helps to pull the page together. The mat under the photo of me and FDR was chosen for the pale green paper which reminded me of the patina of the statues.

One of the most moving sections was the room featuring the challenges of the depression. Apologies for the blurriness of the photo, I had an issue with lighting.

For this page I used the new Archivers paper from Creative Memories as well as some older retro stickers from the early days of Creative Memories. I thought the brown tones went well with the rugged looking statues.

Friday, May 4, 2018

Thomas Jefferson and George Mason

Happy National Scrapbook Day! As this is posting, I'm at a weekend scrap to celebrate the event. Creative Memories began this day many years ago on the first Monday in May.

This layout is part of my visit around Washington DC and I wanted to walk the Tidal Basin. I had never been to any of those memorials and I was excited to see them all. Each one will get its own post on the blog, so stick with me over the next few weeks to see them all.

First up is the Thomas Jefferson Memorial. What an enormous statue! It's a beautiful memorial with text of his famous documents engraved on the walls. I apologize in advance for the poor quality of the photos. Not sure why they came out so blurry this time.
This layout was created with what Creative Memories calls a "Project Recipe". I have the original PDF version, but you can see the idea page here through a pin on Pinterest. So, you'll notice there's no blue in my layout. That's because I used paper from the Imagine paper pack. I wanted the black and red colors as this is a very bold set of photos. The contrast color of yellow actually threw me for a bit but as I look at my creation, I'm liking it more and more. I changed some photos for the unigrid, one for a die cut of a camera, and one for a journal box. Like page sketches, the project recipes are starting points. Make the layout work for you, don't try to jam your photos into something that doesn't tell the story.

Very close to the Jefferson Memorial is a little known memorial for George Mason. He was instrumental in assisting with the creation of the Declaration of Independence and the Bill of Rights. Definitely a forgotten hero.
This layout was created from a sketch. The idea is to use one piece of double-sided paper and cut and arrange it to highlight 3 photos. Here is the sketch. As you can see, I turned it 90-degrees to the left because my photos were oriented slightly differently. The red paper and striped paper are the same page, just 2 different sides. The stars are a border sticker that I thought worked well. I didn't use as many stickers as recommended, but I don't see any "bare" areas that concern me.

Friday, April 27, 2018

Great Falls

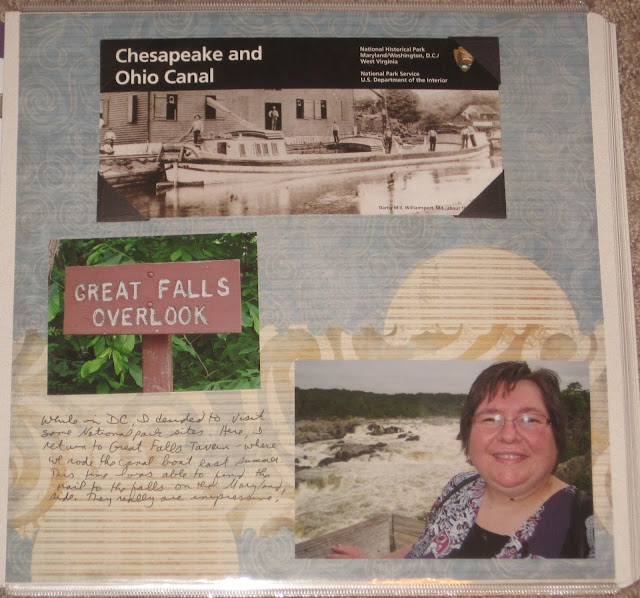
In May 2012 I traveled to DC for a surgical technology convention. In my spare time I visited a few parks. My first trip took me back to the C&O Canal on the Maryland side (where the Great Tavern is). We had been here the previous August with the NPTC convention. This time I was able to find the trail to the falls, and it made for a completely different visit.

This is a wallpaper technique. I used a piece of older Creative Memories paper from a travel kit. I liked the way the design looked like falling water. This is just the right hand side of the layout because the left focused on my convention activities, so I actually posted the end of the trail first--the falls. But that gives good context for what comes next. One notable piece to this page is that I used photo corners to mount the unigrid as I usually do. However, I had 3 made of black paper from my stash (older than 8 years I think), and since they didn't detract from the unigrid, I used them. I couldn't use the 4th one because it would have partially covered the title--so I used one clear corner mount in the upper left.

The new part of my park experience was the walk to the falls. It was an easy walk across planked wood for the most part but took me past some very nice plant and animal displays.

The left page of this layout is also wallpaper. I toyed with the idea of cutting out the left edge as a border but decided I liked the all blue background. I tried to match it on the right with some blue and green mats in the same shades. The right border is another scrap of paper in blue tones. I layered the stickers at the top and bottom onto dark blue paper to make them pop and used a corner rounder to try to match the shape of the stickers. A little dragonfly in the middle made for a pleasing symmetry. And on this unigrid, since the bottom has some color, I used all clear photo corners.

Friday, April 20, 2018

Little known parts of Independence

May of 2012 and it's "Take My Students to the Mutter" time again! On this afternoon, once I dispersed the students to their own devices, I walked through some areas I'd never visited before. They are loosely affiliated with Independence, or at least they list them on their website. Benjamin Rush was a physician during the Revolutionary War and he lived in Philadelphia. He actually helped found the College of Physicians of Philadelphia where the Mutter Museum is located, so I've been learning about him through my many visits there. They have a medicinal herb garden named after him. On my walk through Philly I found his house site and his grave. Christ Church is known more for having Ben Franklin buried there, but it was a double treasure for me to see Rush's grave.

Both pages are wallpaper. On the left I needed something to balance the greenery of the photos, so chose brown tones. I like the swirl on the paper--it makes me think of Grecian columns. The journal box was from the Vintage card pack from Creative Memories. I thought the edge set off from the swirls nicely. On the right is actually a remnant of paper. I mounted it right and then tried to "hide" the missing left edge by mounting the map of the burial ground and the photo of Franklin's grave flush left. There's a tiny bit of un-papered page showing, but not much.

My other stop of the day wasn't exactly part of Independence NHP, but it was in the same genre. There is a group that keeps the Ross house as a museum. The Ross's were real people, but there is no real proof she sewed the flag of our country. Nonetheless, it's a good way to teach people about liberty and the house tour was a nice end to my visit.

This is of course wallpaper again. I thought the antique looking flag the perfect background. The circle of stars frames the entry ticket nicely and the stripes provide a nice background to the photo of the house and the commemorative plaque. I wish I could remember where the paper came from, but nothing comes to mind.

Friday, April 13, 2018

Santa and Trains

So, I have a Dad who's been building model railroads since I was little and 2 nephews who love trains. So I thought that taking them to Steamtown would be a great getaway. Beginning the day after Thanksgiving, Steamtown has a holiday train every year and this was our destination.
The first pages in my layout were created during a Creative Memories Advisor challenge one night. It wasn't a sketch, it just asked us to use current materials. I actually hadn't bought much new paper from them but then realized that I had bought the Fast-to-Fabulous Gallivant collection. I leafed through the pages and found these 2 with red borders and a little splash of yellow. That left the middle open for me to play with. I added the photos of arriving at the park sign, the boys in their engineer hats, and the train arriving at the station. They are simply mounted on photo mats which coordinated with the Gallivant pages.

For embellishments, I did have to resort to the Adventure pack which wasn't as current. However, there was a great circle with a train as well as a die-cut train. The die-cut I mounted on a red square because it was looking odd having multiple colors behind it. The wreath on the die-cut was created through punches. CM had an outdoor theme punch with antlers. I punched those in green and added some small red flowers for holly. The last additions were a postcard journal box and our train ride tickets (added with photo corners).

The next set of pages captures the ride and our visit with Santa. There is a tunnel along the route and it became "magic" as the rangers would quickly switch to Christmas theme clothing on the way to Santa's village, and then back to ranger clothing on the return trip. We sang carols and listened to Christmas stories. It was a fun trip.

Of course this layout had to be more "Christmassy", so I used a sheet of older CM paper which has Santa's belt across the bottom. I added a piece of Holidazzle paper as a mat for the 3 photos. The Believe sticker is from a sheet of holiday words. On the right I tried to match the red background, and because of the caroling photos I chose a sheet of paper with music as a large mat for the photos.

After our train ride we continued to explore the site which has many displays of train cars. It's very educational with a cutaway of an engine to explain how steam engines work.

Both of these photos are wallpaper. The one on the left is obvious because the train pattern is so bold. The one on the right has more of a watermark train in the background and that was harder to photograph.

One of the last things we did was watch the trains used for excursions return to the "barn". This involved the center rail rotating to allow engines to go into different bays. It was great to watch the big engines so close!

On the final layout I wanted to use the train die-cut I made on the Cricut that you see on the bottom of the right page. The tracks are an old CM sticker and the die-cut fit perfectly. Because the diecut was in black and red, I chose to use those colors on the rest of the background. I cut card stock into equal widths and layered them along the page. The last item I added was our entry sticker for the day which I had preserved on a piece of paper in my National Parks Passport. We spent the entire day there and had a great time.

Friday, April 6, 2018

Oh the things I will do for a stamp--part 2

You may recall that I took a Greyhound bus to a rather small city in Colorado and spent all day there to get a passport stamp. Well, while in Las Vegas I managed another incredible tale of getting a stamp. And this time I took my mother along.

I knew that a cab ride from the hotel to the BLM office would be expensive, so I mapped out a trip on the bus system. Having nothing better to do, my mom said she would join me. We weren't prepared to be on a bus that stopped for every handicapped person in Las Vegas. This extended the time on the bus because the bus driver had to get up and hook in the wheelchairs to a special seat area. Then about 2 stops later he had to unhook someone to let them off. We finally finished our first leg and were ready for our transfer. But we ended up standing in the hot sun in what turned out to be a nest of fire ants. We finally go to the last stop and then had to hike about a quarter of a mile to the office. And the only thing there is the stamp. In case you are wondering it's for the Old Spanish National Historic Trail. And I made mom photograph me getting it so that we could scrapbook the story!

We took a cab back--it was worth every penny!

This is a picfolio page which was set for 2 vertical photos. I chose to put an embellishment in one of the blocks and use the space below for a horizontal photo. This is a very simple embellishment--it's actually a journal box with a die cut of a compass rose (from the old Creative Memories "Done with One" page of die cuts). Then I just wrote the phrase. I got the idea from a sheet Creative Memories would give to advisors and are now on Ebay among other places.

I wanted the yellowish tones because it would work with the road stickers I wanted to use. I only regret not using the embellishment space as the journaling box as I could have written more of the story without crowding it into the small journal box in the corner.

And you know, my Mom still goes with me on trips so I guess it didn't completely sour her on stamping :)

Sunday, April 1, 2018

No Fooling--There's a reason they call it "Grand"

I was planning on posting this Friday night, but could not resist another April Fools Day Post. Plus it's Easter and the canyon walls are striped like Easter eggs. What a perfect fit!

Well, after the 5 HOUR bus ride (see last week's comments) we arrived at the Grand Canyon. The bus driver had said that no photo could do justice to the actual beauty of the area, and he was right. While this series of layouts commemorates the visit I made, the colors just cannot compare to seeing the canyon with your own eyes. If you haven't gone yet, please plan to do so!

The left page of this layout is actually wallpaper. I had purchased a series of papers from Ebay which you'll see in the next few layouts. The bottom 3 "photos"  are actually part of the paper, which allowed me to focus on photos of me and my family at the canyon. The right page features a detailed die cut from Paper Wizard. I purchased it at a scrapbook convention in Lancaster and the idea for the page was actually featured in their booth. I took a photo and scraplifted it as part of the kickoff for this trip.

We were given just 2 hours to walk from our drop off point on the eastern side of the south rim to the pick up spot on the western side (in the village). It made me feel rushed, but we did take time to photograph the area.

The right page was my attempt to show the distance to the north rim. I took one photo at wide angle lens and then a zoom photo of the same spot. I thought it rather clever to highlight the similarities in the photos with different sized black rings. The sticker between them is supposed to be an arrow with a right angle turn, but it was a bit too transparent and I think it gets a little lost on the page.

About halfway to our destination we came across the nature walk that describes the formation of the canyon. I do think we went backwards, but it was still interesting.


As I mentioned, all of these papers are wall paper. For the left page above I augmented the text that was pre-printed on the page. I thought adding the word "geology" would provide context for the trail. And we made it to the destination area in plenty of time!